BLOG about IBM Rhapsody. Contains technical information as well as more private travel stories.

Tag: Code Generation (Page 2 of 4)

Training in Bochum: Rhapsody in Java

Introduction

I have been to Bochum before but I normally don’t use Rhapsody in Java… So still a “first”. I can program Java, however! Not as good as C but I’ll manage.

And I have to say… I like RiJ! It is really, really easy to use. Rhapsody brings its own Java so there is no need to install anything! It just works.

It’s a long time ago that I gave a training where all students had their “Hello World” running in minutes.

The Framework is, of course, much simpler, Java already brings everything you need to run UML generated code.

The only thing the Framework needs to do is to process the events and the timers.

Issues

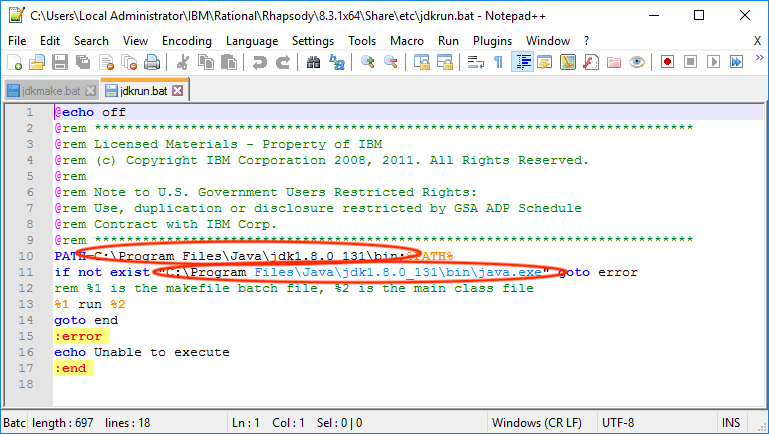
There were not many issues with getting stuff to work. The most important thing was an issue when you installed Rhapsody and selected the wrong java Directory. But this is easy to repair.
in your Rhapsody Share directory there is an “etc” directory. In that directory you will find two batch files: jdkmake.bat and jdkrun.bat. These files have paths in them that need to point to the JDK that Rhapsody delivers by standard.

jdkrun_bat


jdkmake_bat

Hello World Example

The first program you make in any new language is “Hello world”. So we will create a Java Hello world.
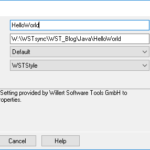
Open Rhapsody in Java and create a new project. Call it “HelloWorld” and create it in a directory where you can find it back. (Rhapsody wants to create projects in the Rhapsody data directory by default.
When the project is created you will see an empty Object Model Diagram. Draw a Class (either select the Class from the drawing menu or right click in the diagram and select “Class”. Then draw the class. Call it “Hello” and give it a constructor, do not give it parameters.
In the constructor write ( in the Tab “Implementation” ) the following:

System.out.println”Hello World”);

Apply the change. Then we need an Object, right click on the Class “Hello” in the Rhapsody Model Browser and select “Make an Object”.
Then press “GMR” (Generate Make Run) and presto: it works!

Happy Modeling with Rhapsody!

Walter van der Heiden (wvdheiden@willert.de)


Reverse Engineering for Dummies

How to import external sources to an Rhapsody Model

Sometimes it is necessary  to use data-types and/or functions defined in header files given by an other developer. In this case the best way is to import these header files as external files to the working model. For external files no code is generated.

In the following article two models are mentioned. A working model with whom the application is developed and an import model to perform Reverse Engineering.

1 – Initial import

To import external sources to a Rhapsody model Reverse Engineering can be used. In the following steps the import process is described.

    1. Open Rhapsody (depending on the language of the given source files choose Rhapsody in C or Rhapsody in C++)
    2. Create a new project (the import model).
    3. Open Tools > Reverse Engineering
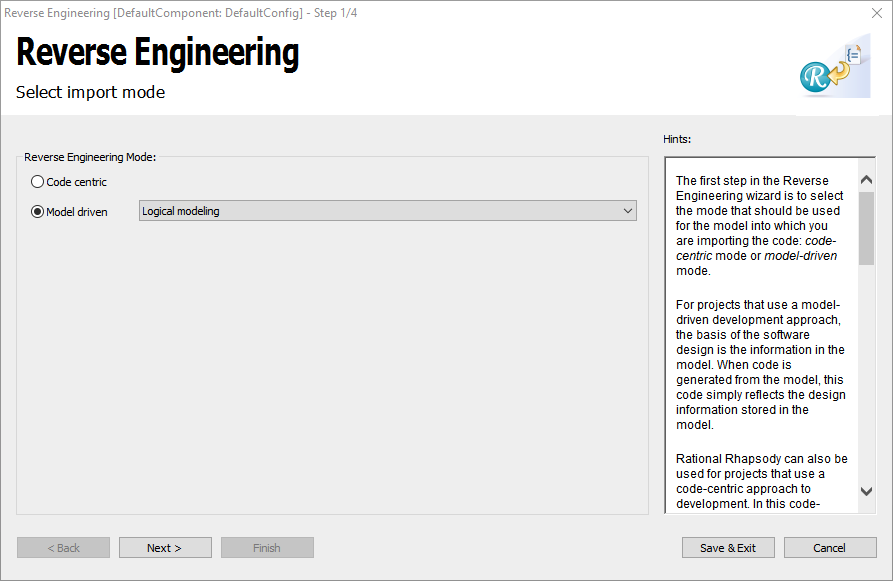
    4. Choose Logical Modelling

      image2018-9-10_15-46-7

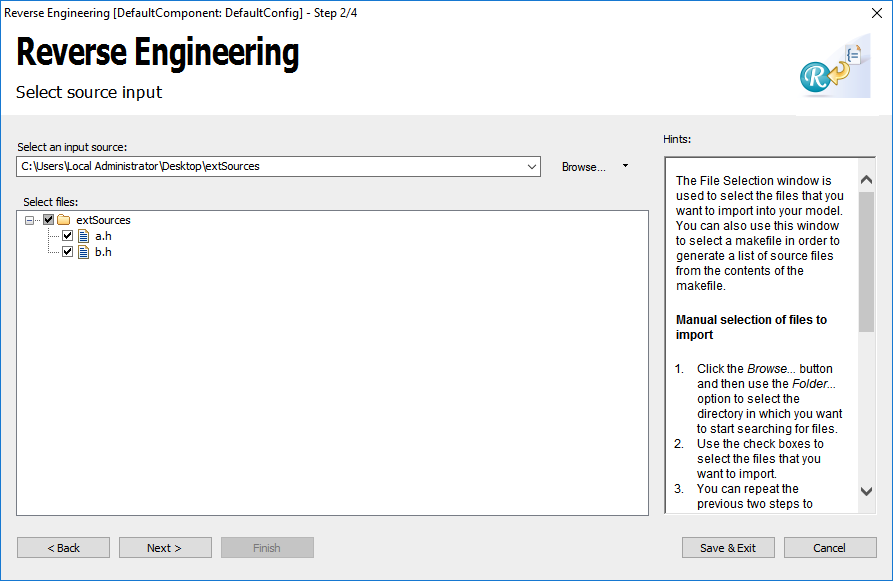
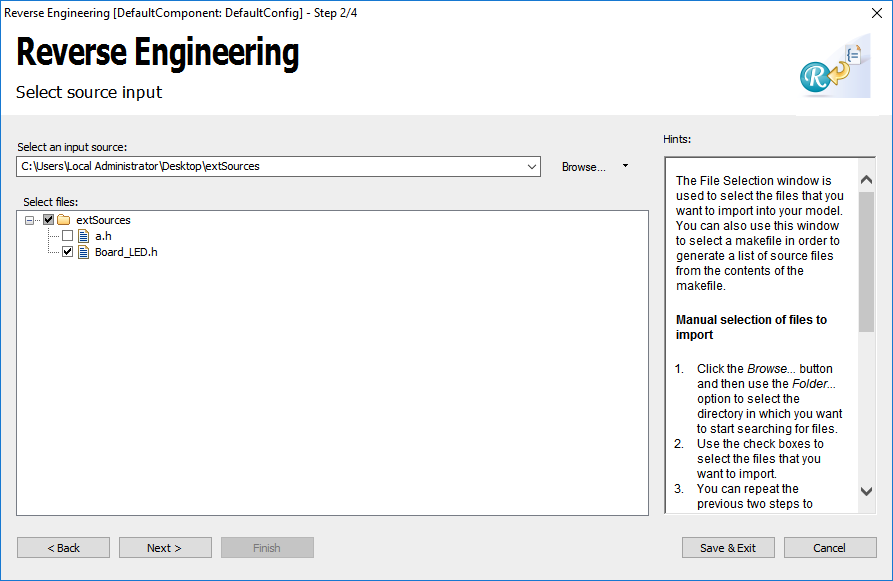
    5. Browse to file which have to be imported and select them.
      image2018-9-10_15-49-12
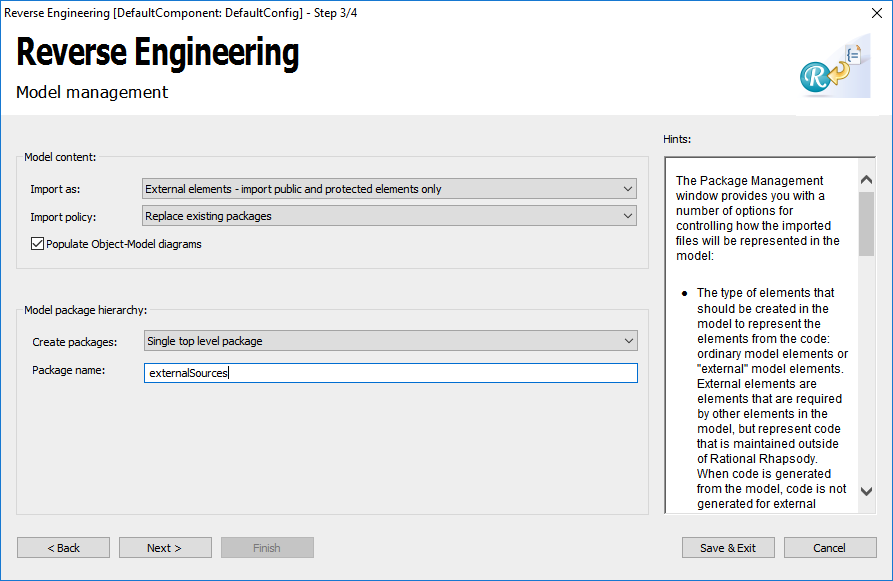
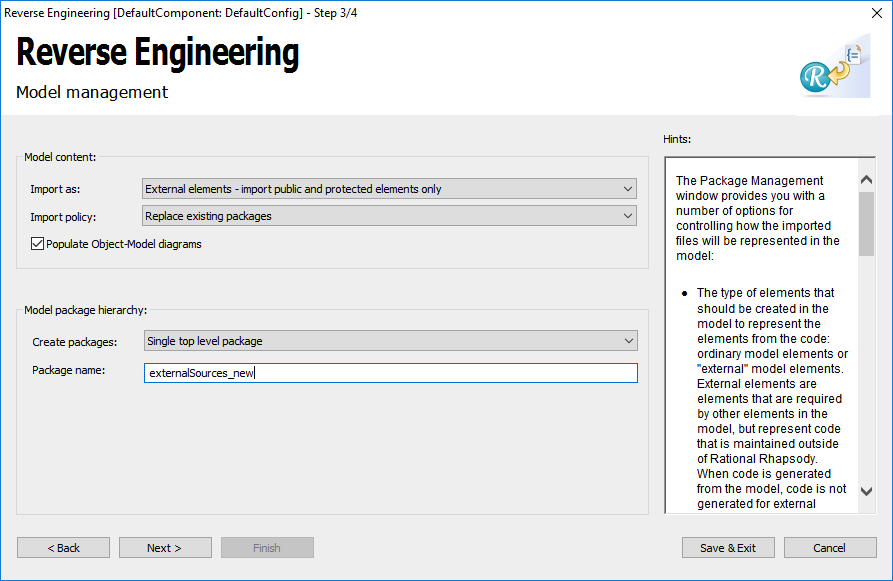
    6. Click Next and set External elements and Single top level package.
      image2018-9-10_15-52-38
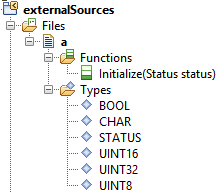
    7. Import files with Next  and Finish. After that you should get something like in the next figure

      image2018-9-10_16-1-0
      At the package icon the small yellow arrow shows that no code is generated for the content of this package.

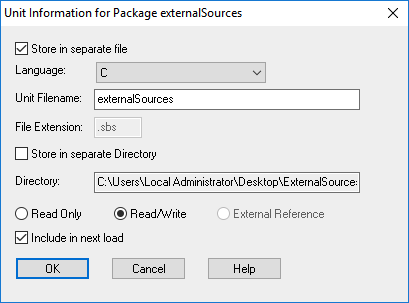
    8. (Optional) If the sources are in C and should be used in an C++ model (the working model) the language of the unit has to be changed to C++. With a right click of the package open the context menu and choose Unit > Edit Unit… and open the following window.
      image2018-9-10_16-6-26
      Switch the language to C++ and click OK.
    9. Close the import model and open the working model in which the sources should be used.
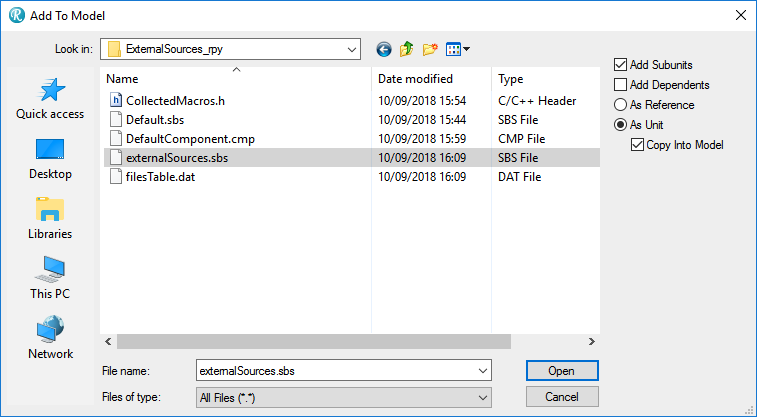
    10. Choose  File > Add to model… and browse to the created package.
      image2018-9-10_16-14-15
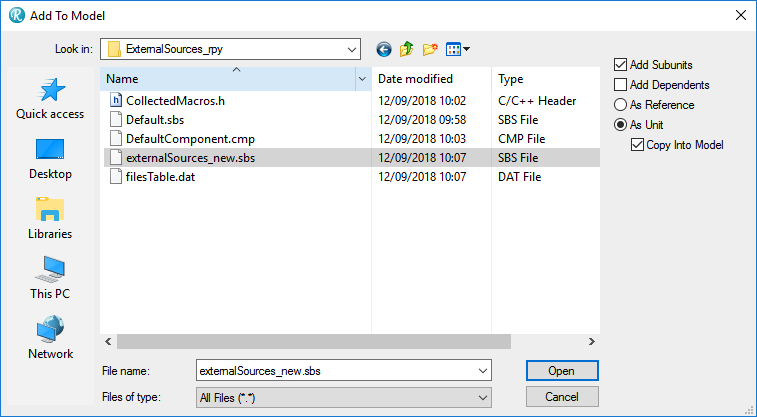
      As options choose As Unit and Copy Into Model.
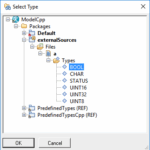
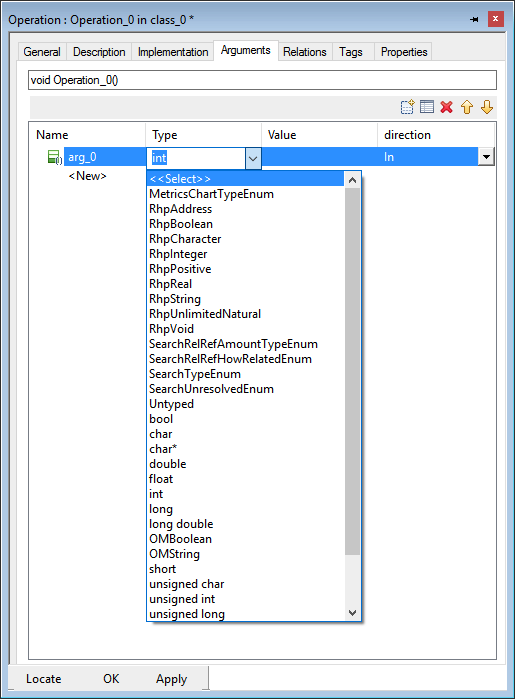
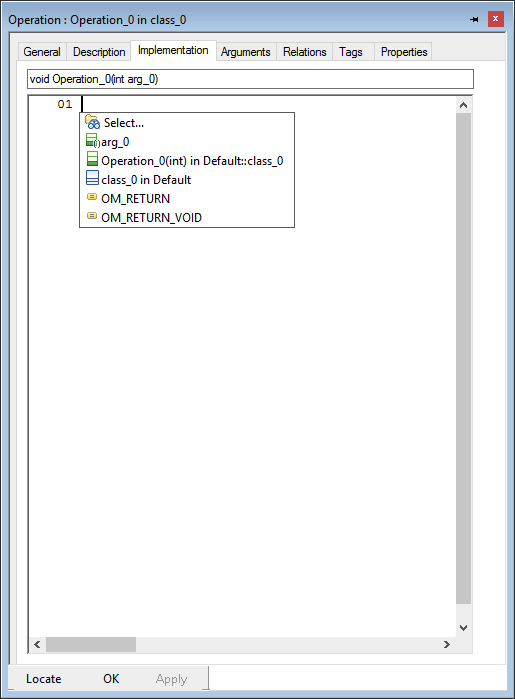
    11. Now the data-types and functions can be referenced in the working model. In the following picture some samples of usage are shown.

      Select return type

      or argument type

      image2018-9-10_16-23-9

      or with the shortcut Ctrl + Space in the implementation.

image2018-9-10_16-24-40


Attention

When executed again, other GUID are assigned to the data types and functions. As a result, they are no longer recognised in the working model and must be reassigned.
If changes occur to the imported sources, they must be manually added to the imported package.
To prevent accidental overwriting, it is recommended to delete the import model used for reverse engineering after importing the package into the working model  


2 – Add additional header files

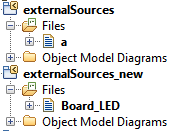
If new header files has to be imported to the externalSources package proceed as follows:

  1. Open Rhapsody (depending on the language of the given source files choose Rhapsody in C or Rhapsody in C++)
  2. Create a new project (the import model).
  3. Open Tools > Reverse Engineering
  4. Choose Logical Modelling

    image2018-9-10_15-46-7
  5. Browse to file which have to be imported and select them.

    image2018-9-12_9-59-0
  6. Click Next and set External elements and Single top level package. Choose another package name (externalSources_new) than in the working model.

    image2018-9-12_10-2-12


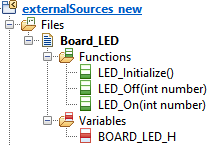
  7.  Import files with Next  and Finish. After that you should get something like in the next figure.
    image2018-9-12_10-3-44At the package icon the small yellow arrow shows that no code is generated for the content of this package.
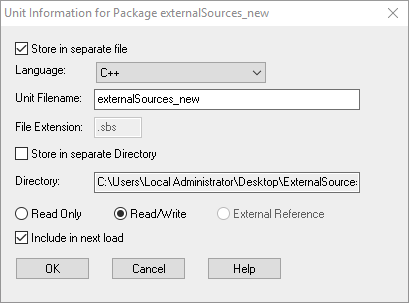
  8. (Optional) If the sources are in C and should be used in an C++ model (the working model) the language of the unit has to be changed to C++. With a right click of the package open the context menu and choose Unit > Edit Unit… and open the following window.
    image2018-9-12_10-5-34
    Switch the language to C++ and click OK.


  9. Close the import model and open the working model in which the sources should be used
  10. Choose  File > Add to model… and browse to the created package.
  11. Now the new file can be moved to the externalSources package. It is easier to handle only one external package.
    image2018-9-12_10-8-4
  12. After that you should get something like in the next figure.
    image2018-9-12_10-9-56
  13. Now the new file can be moved to the externalSources package. It is easier to handle only one external package.
  14. Following video shows step 9 to 13:
    [wpvideo aFGPYz13]


That was it! Thanks to Dennis Koelbel for creating this article and video!

Happy Modeling with Rhapsody!

Walter van der Heiden (wvdheiden@willert.de)

V7 – Released

License to thrill

The number 7 is a famous number, not in the least by James Bond who was, of course, “007”. He had a “License to Kill”. Our V7 has a “License to Thrill”.
That is what we hope it will do to you! OK, It took us a while, admitted, but the first release of our V7 RXF for ‘C++’ is now on our Willert Download Portal.
We have worked hard for it, had many Beta Releases and lots of changes to make the best RXF yet. A big thanks to everybody who worked on it but a special “Thank You” to Johannes who has really done a lot for this release!

What is changed?

  • Completely made with Rhapsody. So the RXF is a model, with everything a model needs to be a good model, Requirements, traceability, Sequence Diagrams, explanations etc.
  • Smaller and faster. (YES! although modelled and generated, the code is smaller and faster!)
  • All adaptations integrated in one version. You select RTOS, compiler, CPU etc via tags.
  • New Deployer, this one remembers a lot more of your stuff. (Is not completely finished yet but I’ll give the new features)
    • Creates direct links to the Rhapsody code in your IDE so round-tripping just works!
    • Able to create you own template models that you can select, they are then copied
    • stores its settings in the project
  • Latest Target Debugger
    • faster, will not degrade performance when many events are processed
    • new design, improved stability and usage
    • break-point editor
    • editor for event injection
    • export to Rhapsody
  • Easier to configure Memory Management

For the time being only in ‘C++’, ‘C’ will take a while. But with a decent compiler we recommend ‘C++’ anyway. Bob Dylan already sang it a long time ago: “The times they are changing”. And that is what happens. From ‘C’ only in 32Bit on 8 and 16Bit Targets to ‘C++’ on 64Bit on 16- and 32Bit Targets.

That was it for now. It’s hot here… almost too hot to work. Luckily we are getting used to it.

Have fun with Rhapsody!

Yes we CAN! (part 1)

Introduction

What are we going to build? A CAN implementation. How? Well…. I’m not sure myself. I will just start and write down my experiences along the way. For sure we will use our standard Board for that, the Keil LPC1768 board and we will, in parallel, implement on a PC using a USB-CAN connection. We will use Rhapsody in ‘C’ for that. C++ would be too easy…. (It’s not… but Johannes is already working on that and I don’t want to interfere with that. )

What are we exactly going to build? Years ago I did build two small apps, a master and a slave app that were exchanging info via CAN. On the Master Board you could operate the Potentiometer and the values were send to the slave board where an LED was regulated.

This is the first step we are going to build. I would like to build a different app, namely one that can log CAN messages to a PC. That would involve a PC program as well to interpret the CAN messages and display them. I’m not sure how to do that but I think we will get ideas when we start using CAN.

Preparations

First let us do some model preparation. For the first steps we need 4 Rhapsody models and, of course, the IDE projects as well.

The Rhapsody projects need to be prepared, a lot of things can be done by using profiles but unfortunately not everything. Global properties must be set in every model. (There are tricks around that, I will spend a future BLOG entry to that tricks, I promise! )

So we create the following projects:

  • lpc17xx
    The CAN driver for the Keil board, mostly already there in CMSIS packs.
  • PC_sim
    The CAN driver for the PC, not sure how (yet) but let’s prepare for it.
  • master
    Communicates via CAN to the slave that will receive commands and executes them.
  • slave
    Gets commands from the master and executes them.

The best way to work with these models is to load them all in Rhapsody. This can be done by creating a Project List with “File”, “Insert project”.

The following profiles must be loaded:

  • Rpy_C_CMSIS_Keil5_ARM_MCB1700_TD_Profile (only Master, Slave & lpc17xx)
  • Rpy_C_Win_VS13_PC_TD_Profile (only Master, Slave & PC_sim
  • WST_Types, this implies some global properties to be set:

    General::Model::CommonTypes must be set to: WST_Types
    General::Model::DefaultType must be set to WST_Types::uint32_t
    *EDIT* – Not necessary anymore! Although the properties are “Model-level”, you can still set them in a profile. The Code Generation is done from the Component/Configuration and will therefore use the properties. Very cool. Not sure why the selection box of attributes and variables show the types but, hey, let’s not look a given horse in its mouth….

  • WSTProfile
  • WST_CG_Profile

It is convenient to include all profiles in a separate project in the beginning, you will have to change stuff often, it is better to have everything within reach.

Here is the profile that you can load to have C99 types AUTOMATICALLY! WST_Types

Set the following global properties to make working with Rhapsody easier:

  • Browser::Settings::ShowOrder to YES
    Lets you re-order elements in the Rhapsody browser.

  • Browser::Settings::ShowPredefinedPackage to NO
    Removes the Predefined Types Packages from the browser

  • Browser::Settings::ShowSourceArtifacts to YES
    Displays source-artifacts. Since we also set the Roundtripscheme to “advanced” there should be no source-artifacts.

Workflow

The idea is that we put all hardware dependant stuff in the lpc17xx and in the pc_sim models, we include these into the master and slave models to make the last ones completely hardware independent. When all is ready we start preparing the models for the implementation.

Structure:

  • CAN
    • Model
      • LPC17XX
      • Master
      • Slave
      • PCsim
      • profiles
    • Code
      • LPC17XX
      • Master
        • LPC17XX
        • PCsim
      • Slave
        • LPC17XX
        • PCsim
      • PCsim

This is a good working structure, maybe we do some fine-tuning later on.

LPC17xx Model

This will include the implementation of the hardware drivers for the MCB1700 Board. It needs some packages to store the work we do. We do reverse engineering to achieve most of that.

The next is the project where we store the generated code.

Keil Projects

In Keil we can also create a Project Space/Workspace to handle multiple projects. First create the projects themselves, Keil will not let you create an empty workspace…

First we create the empty project for the LPC17XX, select the correct CPU (NXP lpc1768) If this does not show up, you first have to install the pack from NXP. After you have done that, select the packs we need, RTOS and CAN. Don’t Worry! We can always select other packs when we need them!  You do not have to click all ticks right away…

We can copy these projects to the Master and Slave directory once we are happy with them. Or we wait until we are done, that’s probably better.


PCsim Model

This is the model that contains the same as the lpc17xx model but then runnable on a PC as simulation. It is important to have something that can run on a PC to make testing much easier.

The next is the project where the generated source code is stored and compiled.

Visual Studio 2013 Project

A Microsoft Visual Studio Project. I still use 2013, that is also supported “out-of-the-box” by Rhapsody, we also have a 2015 Adapter.


Master Model

The model that contains the Master Model, the model that serves as a master in the CAN network.

Slave Model

The Rhapsody model that acts as slave. There are also projects for the source code for both ARM and PC.


CAN we?

I’m not going to write a lot about CAN itself. There are enough pages on the web that explain what it is, that it was invented by Bosch, how the priority works etc. Try Wikipedia and you will as smart as you need to be for this in minutes.

How can we model a CAN communication? Well that is not too difficult (I think) but we should ask ourselves: What do we really want to model?
I think we should use as much driver technology that is already there. On the Keil Boards that is easy: the CMSIS Packs give us a lot. We need to include it in our model somehow and then build intelligence above it.


Prepare the LPC17xx model

We will use Rhapsody Reverse Engineering to prepare it. Since we only use the outcome of this we can do reverse engineering without any other preparation (RE changes a lot to your model and your Component/Configuration, since we do not build anything here we just leave it)
We first prepare the LPC17xx Keil Project to have the sources there for RE.

  • Open your Keil project
  • Open the Pack Installer
  • First install all packs needed ( Left Window, Boards, MCB1700 )
  • Then install Examples (Select MCB1700 in left window, then right window will show you CAN Example (amongst others)
  • You can find the Sources (or actually the includes) to use for Reverse Engineering in:
    • <Keil Install Dir>\ARM\PACK\ARM\CMSIS\<latest version>\CMSIS\Driver\Include\
  • Open the LPC17xx Rhapsody Model (In Rhapsody in ‘C’ please, will not work the same in ‘C++’.
  • Rename the Component to “reverseEngineering” and the Configuration to “keilMCB1700”
  • Start “Tools”, “Reverse Engineering”
    • In the first screen select “model driven”, “logical modeling”
    • In the second screen enter the path for the include files, then select all files. (We only need CAN but why not create a complete model right away, costs nothing and might be convenient later on)
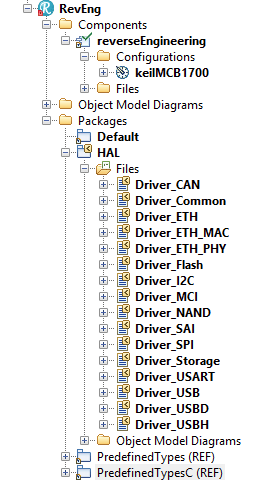
    • In the third screen, leave the top 2 fields (“ordinary model elements” and “replace existing packages” but change the 3rd to “single top level package”and name it “HAL”
    • The fourth screen is OK, press “Finish” to perform RE. The result will look like the picture on the right.
      • Screen Shot 2018-07-16 at 14.21.32

Now we can use this model in the other models to have a CAN driver included.

Just do an “Add to Model” in both the Master and the Slave Model and include the “HAL.sbs” file there (As a (REF) of course )

When you have done that you can select all HAL functions with the INtellivisor ( Use “select” )

In the next part we are going to implement a simple CAN send and receive function that just sends and receives generated messages.

from there on we are going to implement things like:

  • publisher subscriber, so you can subscribe to a certain kind of  CAN Messages with a callback function and that will program the CAN Acceptance Filter (if there is one)
  • define messages for sending a value and receiving the value.


That’s it, the rest follows soon in part 2!

Happy modeling with Rhapsody if you CAN!

Walter van der Heiden ( wvdheiden@willert.de)


PS

I just used a picture of Obama because he used the “Yes we Can” slogan in the 2008 elections and I found that a nice wordplay. Please do not assume i meant anything political with it, I never want to discuss anything even remotely political in this BLOG,
I do not want anything else than just technical discussions here.
I use other platforms to express my personal opinions.

W.

Modeling with AUTOSAR

Introduction

This is a small excerpt of my presentation at the IBM IoT CE Conference in Munich from may 14-16. A very nice conference, if you were not there: you missed out!

The Challenge

I might have said it before, cars are the most complex thing people build. Even more complex than planes. I “borrowed” a slide from Debby Edwards Keynote from the conference. That clearly shows it.
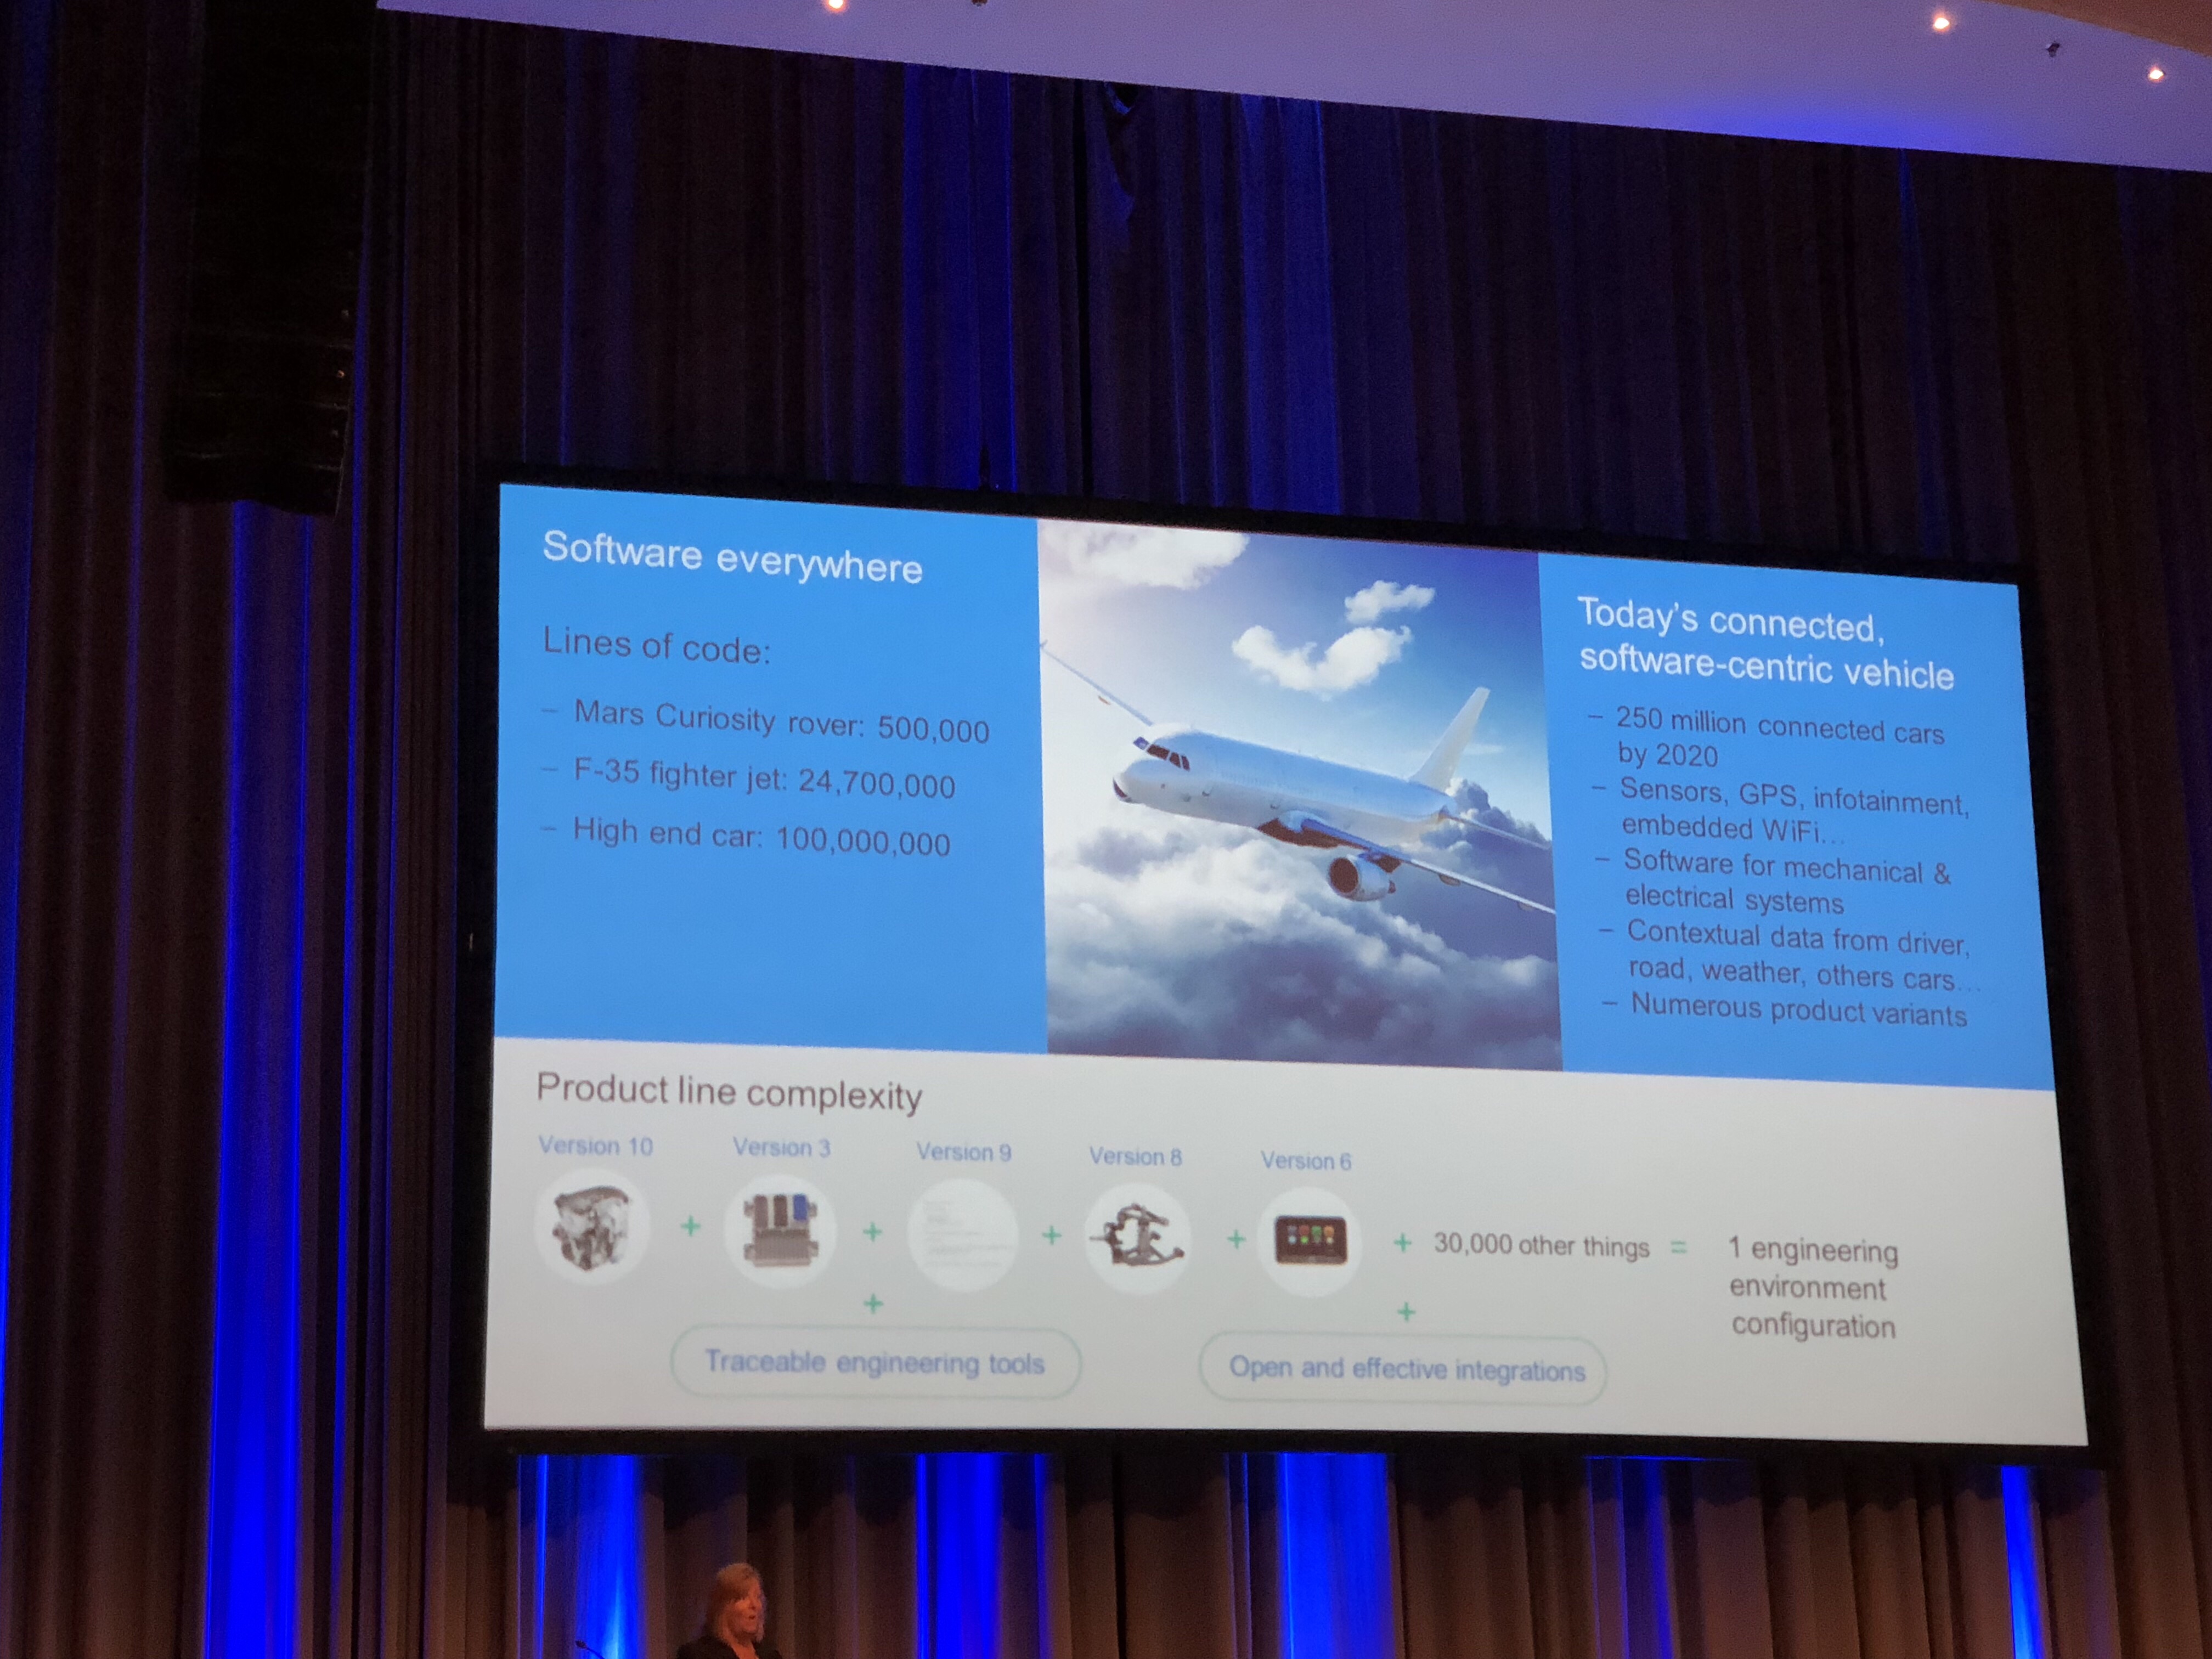
The F35 (JSF) plane has about 25 million lines of code, a modern high-end car 100 million. OK, there are trade-offs, like do you add multi-media systems or is a passenger plane more complex but the general idea is just: making cars is an immensely complex process. But look at a random big city during rush-hour and you see: The Automotive Industry still manages to make cars that work with a remarkable reliability.
Not always, we all know examples from cars that have huge electronic problems (I can tell some stories about that myself…)

No why is a car more complex than a plane? Well, part of the complexity is self-inflicted. Compare this:

  • Car > 1.000.000 pcs < EUR 100.000,-
  • Plane < 1.000 pcs. > EUR 100.000.000,-

this says it all, cars are mass products that are cheap (relatively to planes…) and planes are almost built-to-order products that are expensive.
A plane manufacturer does not bother the price of a micro-controller, they have a small number of certified ones that they choose from. If it costs EUR 2,50 or EUR 2,80 does not really bother him.
Now the car manufacturer is interested. If they can use a CPU that costs only EUR 0,10 less than another one for a device that is in a car (or even multiple times in a car) than the calculation looks different. 1.000.000,- * EUR 0,10 is already EUR 100.000,-
So mostly they choose small Microcontroller that barely fulfill the needs of their developers, adding to the complexity.

Mastering complexity: Process

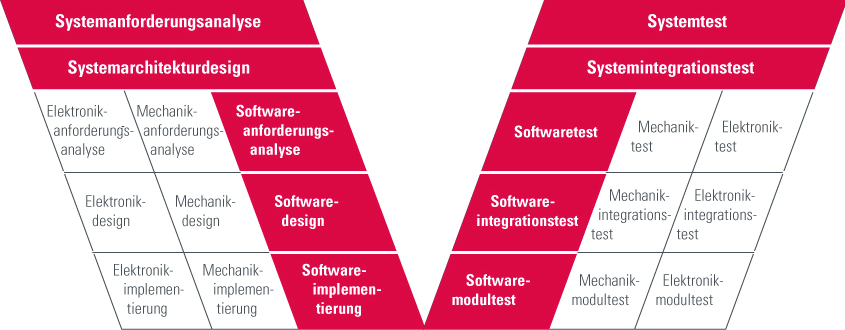
autospice.gifOne of the things you can do to master complexity, certainly if you are not changing the tool environment.

The Automotive industry has a process, Automotive Spice or short A-Spice. A thorough and already more than 10 years old process that is a big help in mastering complexity. Of course A-Spice does more than just helping to master complexity, but that is not in my focus now.

The process helps you to define what needs to be done in what stage of the development. So every item is defined and there is a definition of what should be in there. This helps engineers to gather information and present it in the right way to their colleagues so the development information is always up-to-date.
This process can be followed by hand, of course, but this is so error-prone that I strongly advise to use tools. We discuss later what tools and how.
automotive.png

Also mastering Complexity: Abstraction

The way to master complexity is the use of patterns (or abstraction). Abstraction can be explained by looking at this bunch of matches. If you need to count them, sorted like that, it is not that easy. So you sort them in groups, that makes it much easier to count. That is abstraction, you just follow the pattern and it makes it much easier. The disadvantage of this is: space/time drawbacks. You see that the matches take up more space if they are close together then when they are sorted.


csm_721435599Fuenf_Streichhoelzer_5780056202_6af0698c2e_o_129adc9027.jpg

the same applies for patterns in software, they help you solve complex things but also at a price. The fact that the pattern is universally applicable creates overhead.

Not mastering Complexity: AUTOSAR

csm_AUTOSAR_01_c35041dc46The Automotive industry created AUTOSAR with a couple of goals in their minds. They wanted to make it easier to switch suppliers by letting them use a standard interface, they wanted to have multiple suppliers that develop applications on a single controller without having to know each other and be able to slip applications over multiple ECU’s without redesigning the complete application.

The extra data in AUTOSAR applications is stored in XML files called ARXML. This can be parsed and imported and tools can in that way exchange information in a standard way. That sounds fantastic but in praxis the advantages are limited, no one wants to share more information that absolutely necessary with others from a competitive standpoint.

AUTOSAR uses abstraction, they have standard software layers (Basic Software) that implements a lot of basic stuff. This will solve some pain but also introduces new complexity, the Basic Software layers are not easy to use.

AUTOSAR uses a Run-Time Environment that is derived from OSEK, the OS is very static and generated from ARXML. Although it sounds cool to just generate separate pieces of code that will be executed “somehow” this is not aiding to understandability.

You cannot create an easy to understand architecture that explains how your software is built-up and how it generally works. It basically adds a lot of abstraction overhead for a non-effective abstraction, it is measured that the use of AUTOSAR will almost double the memory needed compared to non-AUTOSAR solutions!

The conclusion is that AUTOSAR is not designed to lessen the complexity, on the contrary, it adds to the complexity. Experts estimate the complexity of AUTOSAR about 10 times that of SysML.

Certainly mastering Complexity: UML/SysML

UML and its sibling SysML were created to master complexity. The graphical way to model using different diagrams that help the developer concentrate on different aspects of development without being distracted by other stuff.

UML is used to make software, SysML is a UML profile that uses some of the UML diagrams, sometimes in a different way (The same elements but they have a different meaning) and adds some new diagrams. It is used to make systems.

Many Automotive customers that want to start using modeling ask for SysML, since they make systems, not just software. Now there are a few disadvantages to that, it is harder to make just software from SysML, so you probably do stuff 2 times or you have to write helpers that do intelligent conversion/linking between your SysML and UML model.
The funny thing is that most people who ask for SysML, in the end only create software. So they would have been OK by using UML.

One of the nicer aspects of the UML is that it is set-up to be flexible and configurable. A good example is SysML, this is actually a UML profile. the same thing for the AUTOSAR profile, it changes the way the UML looks and feels by just loading a profile.

UML Tools help you in creating links between several development elements. In that way you can create traceability that helps you find back your stuff (and the reasons why you solved it that way) and is a must for certifications in safety-related applications.
The standard graphical UML helps you define and understand your architecture.

Helping to master Complexity: Tools

As already said, following a process with just pen and paper is not doable. Luckily there are enough tools around to help you in the development of your applications.

Most tools more or less use their elbows towards other tools to conquer as much space in the V-Model as possible. They all want to be used for everything. They all claim to have solutions for the complete process from requirements to acceptance test.

My advice: Don’t buy that!

Most tools have a specific area where they are good, or even “The Best”, on other area’s they shine a lot less and you could use much better tools.
Now it is understandable that you want as less tool switches as possible during development. Every time you are confronted with information that needs to be synchronized or linked. This needs to be solved good.

You may need AUTOSAR Tools to generate RTE and to have access to Basic Software and or stacks.
You may need Simulink (with Embedded Coder or Targetlink) to generate code for pi or pid control loops
You may need a UML Tool like Rhapsody to have your architecture defined, use statemachines to describe behavior and much more

There are lots of tools available but you should be using a combination of the tools that fits your needs and can be combined with each other.

The Master: Single source of truth

Or “How to avoid having multiple captains on one ship”. All Tools manage information. Sometimes information from different tools must be linked. Then you must use some synchronization (like IBM Rhapsody Gateway or the Willert RequirementXChanger) to keep the information synchronized AUTOMATICALLY! In that way you create a so-called “Single Source of Truth”, only one tool can be the master of a specific type of information. You have to define in your process definition which tool that is and how its done.

Be the Master: use Rhapsody with AUTOSAR

Method 1: Model AUTOSAR
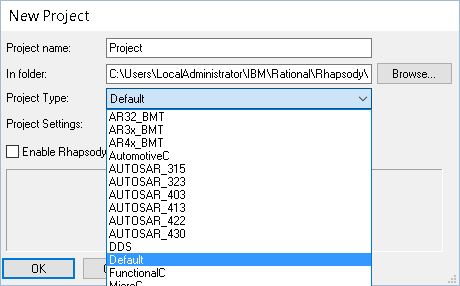
New Project.JPG

This is the “full-fledged” way. You load one of the AUTOSAR profiles in Rhapsody. This changes the look and feel of Rhapsody to be an AUTOSAR modeling tool. The good-old UML elements are all disappeared and only AUTOSAR Items are available.autosar project
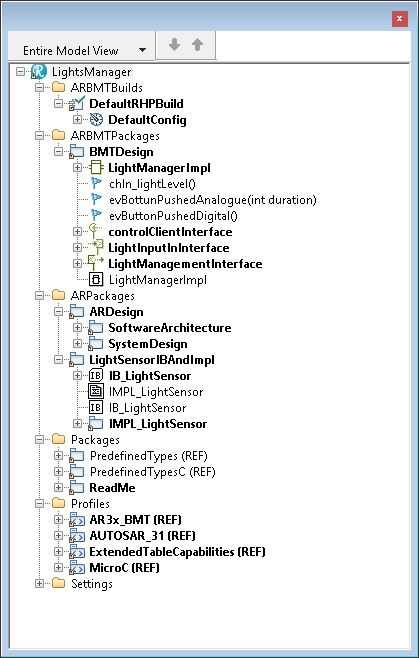
You can now use AUTOSAR diagrams (Block diagram etc) and model that. You can export your model into an ARXML file that you can use for other tools and for the RTE Generation.

If you want to use “plain” rhapsody state-charts you first have to add a so-called “RIMBO”, connect the interfaces and then you can use “normal” rhapsody.

This is the way IBM recommends.
Since 8.3 you can safely use the 64-Bit version, in AUTOSAR: Do that! It will be slow otherwise.
You can combine 64 and 32 if you have an older version, import/export with the 64-bit, do the rest as 32-bit.

Method 2: Transform AUTOSAR and model UML

This is the “Willert” method. For the AUTOSAR stuff you use an AUTOSAR authoring tool. Then you export the ARXML from there and import that into Rhapsody using the AUTOSARXChanger. The result is a UML model with”converted” AUTOSAR elements. They are, however, normal UML elements with stereotypes.
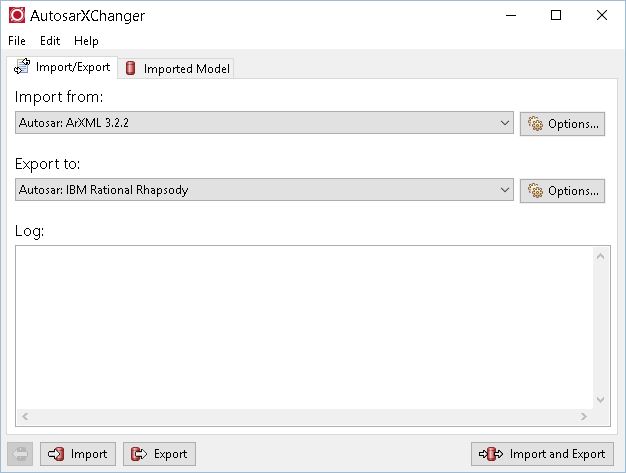
autosarxchanger.JPG

Willert is working on other ways to use Rhapsody in an Automotive environment. We will have an exporter that can export UML models (with the correct stereotypes) to ARXML files.

Keyless Master

An example how this works.

Keyless Master: Marquardt Case.


OK, that’s it! Happy modeling/mastering/driving!

Walter van der Heiden (wvdheiden@willert.de)


Florida 3: Hard-Rock Café

Hard Rock Café

The Hard-Rock Café is a must-visit on all my trips. I always buy a t-shirt (although my wife tells me that I have more than enough t-shirts already…)
The fun with the HRC t-shirts is that they have the name of the city printed on it. You can only buy them local, not on the internet, they have only neutral shirts there.
So if you see someone with an HRC t-shirt from some far, far away destination, he or she has either been there or has a good friend who has been there. (No, I will not bring you a t-shirt…. go there yourself…)

So on the Florida trip we decided to visit ALL the Florida HRC’s. Yes, all of them…
Key West, Miami, Fort Lauderdale, Tampa, Orlando, Daytona Beach and Nassau (On the Bahama’s, not exactly Florida as you can read on …)

We did Key West so the next day we left Arno’s house to drive via Tampa (HRC in the airport) , Orlando (HRC is in the Universal Studios) to Daytona Beach where we stayed in the Hard Rock Hotel. Then on to Miami (next to the Harbour See … )  via Kennedy Space Center (read …) Fly to Nassau and stay on the Bahama’s for a day (See: … ) and finally to Fort Lauderdale ( HRC in the Casino ) and then back to Fort Myers. Great trip, I can recommend it!

Sequence

I receive many questions about how to influence the Rhapsody generated code. Now you can post-process the code using the simplifier or even change the rules with our rules-composer but sometimes you should make life not more complicated than it already is.
There are more ways to ensure Rhapsody generates exactly what you want.
Ask most modeling guru’s (and the traveling modeler agrees…) and they will tell you: You have to model in a way that sequence doesn’t matter. As already said: I agree. But…..
There are circumstances where you just cannot model as you want to. The smaller the controller, the more rigid the real-time requirements, the more trouble to fit everything in and to certify it works.

Classes

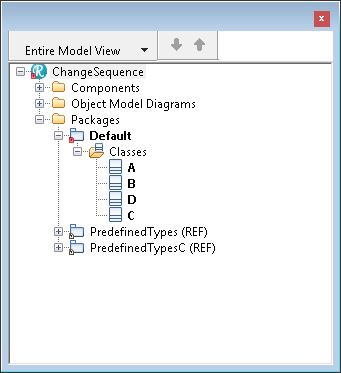
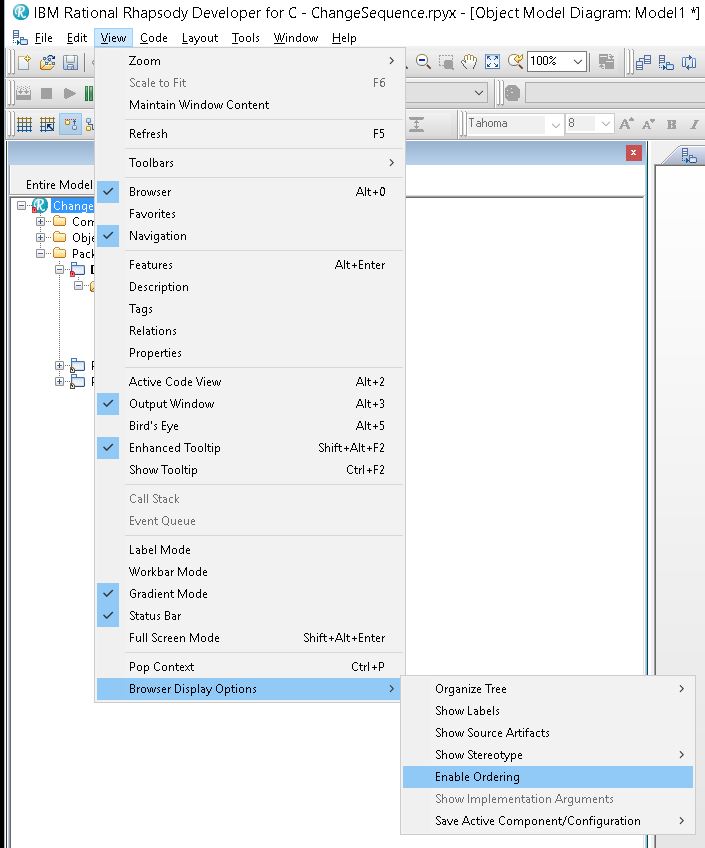
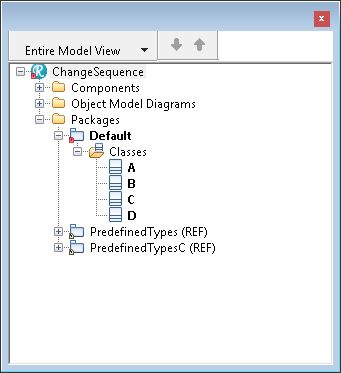
Open a new model and if you create 4 classes (in this sequence!) “A”, “B”, “D”, “C”, you will see in your browser that under the default package you have the 4 classes, sorted alphabetically, A, B, C, D. BrowserUnsorted.JPGThis is just the “visual” sort, you can switch that off with either a property or with “View”, “Browser Display options”, “Enable Ordering”. This will switch on the small yellow arrows on top of the browser that let you order items as you want. (Only Visual!!)

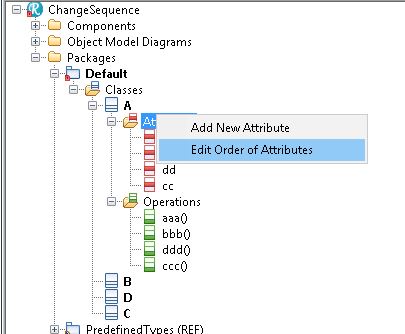
Now the sequence of Code generation is not relevant for classes since they have their own file. The sequence of attributes or operation within a class can be important!OrderMenu.JPGBrowserSorted.jpgNow that can also be achieved easily. Rhapsody offers the sorting from within the browser. Depending on if you have switched on the “Enable Ordering” all elements

Editorder.JPGare either shown alfabetically or in the sequence that you have entered them in the model.
The code generation for attributes and operations is not depending on that setting!! Code is generated in alphabetical sequence, or the sequence that you give in the “Edit Order of Attributes (Operations)”.
This opens a dialog where you can precisely select the generated source code sequence.

Now if you have created objects statically using “Make an Object” or by just creating them you can do the same. Right click on “Objects” and you can select “Edit order of Objects” you can select the order that the objects are instantiated. (Do a regenerate, Active Code View is not automatically updated) The same applies for singleton Objects.

This also works with dependencies (with Usage, that will select the sequence of include)

Happy modeling with Rhapsody

Walter van der Heiden (wvdheiden@willert.de)
Deploy back

Introduction

The title is a bit double today, i was deployed back from india to home and I will explain how you can deploy to your Rhapsody project and not lose the “roundtrip” feature!

Deploy back Rhapsody

The purpose is to deploy and leave all files exactly where Rhapsody has generated them so that you are still able to do roundtripping.
It is not completely straightforward but certainly doable.

Assuming that you have a directory c:\work. In that you have 2 directories, Model and Code. The structure is as follows:

  • c:\Work
    • \Model
      • \MyModel
        • \MyComponent
          • \MyConfiguration
            • “This is where Rhapsody generates your code”
    • \Code
      • “This is where the project file for the IDE is
      • “Generated Model”
      • “RXF”
  • RXF install
    • Tools
      • WSTDeployer
        • WSTDeployyer.properties

The trick is to map the “Generated Model” directory to the “MyConfiguration” Directory. Depending on the age of your deployer this is very easy, easy or just a bit of work….

In some deployers you can edit the name of the “Generated Model” directory in the dialog. If not than there is a deployer.ini file in the RXF installation directory, you can change the name of the “Generated Model” directory to the name of MyConfiguration.

Then move the project file (or the complete project if you have already content in it) to the MyComponent directory, start the Deployer Configuration (In Rhapsody under “Tools”) and select the just moved project file.

That’s it.

Deploy back the traveling modeler

Now that turned out to be a lot more difficult… The planning was to fly home on Sunday Evening. Or technically on monday morning, the flight from Delhi to Paris would leave at 00:15 Delhi Time, 19:45 CET ) I had a late flight (19:30-21:50)  from Hyderabad to Delhi and so less than 1,5 hours for my stop-over. From the trip to India I had learned that this was not nearly enough.
At first I thought, well lets just see what happens but since I did not book the flight as a complete flight, missing the plane from Delhi (to Paris) would not be an option.
So I checked the goindigo.in website and I found out I had been clever enough to book a flight with rebook and cancel options. Yeah….
So I rescheduled that flight to be early enough (16:00-18:25) That would be more than enough.
So I left the hotel exactly at 12:00 (CET: 7:30 Sunday )packed and paid. On my way home! I took a Uber to the airport, that was almost an hour drive ( and almost €8.- )

There I tried to figure out where I had to be. That is not too easy, the airport did not make announcements and I was pretty early so my flight did not yet show up on the monitors. But I could check in my luggage (I had booked the Fast Forward Option, a good idea in India…) quite fast. I did not have to stand in line.
So I was there hours too early but hee… better than 1 minute too late…. Spend some time shopping for home, drinking a Mango Lassi, eating something.
The plane left in time and flew on-time. My suitcase was in-time, the bus was easy to find and even waited for me so I was on the correct airport terminal early. checked in my suitcase within an hour of landing…. So it is possible.
But I seriously doubt if that is reproducible, So i did not mind being early. What I did mind is that just before boarding time, Air France started to make announcements about delays.

The plane was delayed. For more than an hour. Not cool, my connection in Paris was only 1:20…. not too long.
The plane left too late but promised to make up for lost time. It was an old Airbus 330. Also no USB chargers and very limited seating room for a continental flight..
On top of that the two ladies in front of me immediately reclined their seats the moment the “Fasten your Seatbelts” light went of. Sigh.

Next to me sat an old lady, very friendly but she only spoke French. i do speak a little French but not nearly as much as English or German… This was going to be a long flight.
Normally (I’m used to KLM) on long flights, you first get a drink, then dinner, with drinks and another drink or coffee after dinner. Then the lights go out and you can sleep (if you like) Air France pushed out drinks together with the food as fast as possible.
The ladies in front of me continued “sleeping” and did not eat. And refused to put her chair back. So I had about 30cm for my food. Thanks!
I managed to eat and drink that without accidents and noticed that there was not going to be anything more to drink or eat.
The ladies in front of me thought that this was the right time to change their minds and to order food and drinks. Thanks!
Chairs were kept in the sleep position, of course.
I got my earplugs and my face-mask and prepared to sleep. At take-off the family in the middle row, 2 rows before me already had trouble with their 3 kids but as soon as the lights went out the kids decided that it was time to start waking up the other passengers. Thanks!
The seats in the old A330 were clearly out-dated. So with a back that hurt, no sleep what so ever I ate my breakfast. The pilot had broken his promise and did not make up for the lost time so I would arrive an hour late in CDG, not really my favorite airport..
Flight attendants could not give much information, just that we landed on terminal 2F and that I had to go to 2E. Sounds close, but I know CDG, it is not close…
I gathered my luggage before the landing so I could run out of the plane fast, I even ignored the ladies in front of me and as soon as the plane was stopped I ran to the door. There I waited until it opened and I started my morning sport… I had less than 20 minutes but…. I made it! In spite of passport check and even a security check (WHY???) that cost me my water (grrr) I made it to the plane in time.
I crashed in my seat, luckily here there were some better tempered passengers, they had fun about me sweating and panting.
I didn’t care, I made it in time. I was pretty sure that my suit-case would not but I did not care. Air France would take care of that.

And then the pilot announced that we would have some delay because of the fog in the Netherlands… To make a long story short… that took 3,5 hours. Leaving the plane was not allowed (They would not let you in again…. many passengers with connecting flights left because they would not make their flights) so I stayed. There was water and a sandwich and finally we took off.
I arrived at Schiphol around . I thought: well there is a sunny side: My suitcase has made it now: not. CDG was not able to adapt. So I waited at the luggage belt for nothing. Then to KLM, report missing luggage, then the train home. I arrived home at 5:30pm, 32 hours after I left the hotel…


Happy modeling with Rhapsody!

Walter van der Heiden (wvdheiden@willert.de)


Hyderabad

Indian Traffic

My destination was Hyderabad this time. Never been there before but I have been to India before. I really like india, nice people, beautiful country. The country is big (certainly compared to the Netherlands…) and the amount of people is huge (1.3 Billion!)
The traffic is just amazing. In Europe we mostly drive on the right side of the road, in the UK they drive on the left side and in India they drive wherever there is place…

The first time i was in India I was picked up at the airport in Mumbai (Bombay) for a taxi-drive to Pune, a 160 kilometer drive that took almost 4 hours.
The first half hour I spent saying goodbye to my life. I was pretty sure I would not survive the drive. After a while, however, you figure out the (actually very simple) rules of driving in India.

  • What’s behind you is not important. It’s their problem, not yours.
  • Honk at least once a minute. (Otherwise your car will explode, I think)
  • use every free space on the road.
  • use all available room next to a road as well.
  • You have priority if you are there first.
  • don’t be aggressive or mad, the others know what they are doing.

That’s about it. The last one is important. Most drivers know pretty well what they are doing. “But India has the highest mortality rate in traffic” i hear you say. Yes true. But that happens only outside of the city. In the city you just cannot drive fast enough to die in an accident.
In the same way you can cross the very busy streets. Have confidence in the others, they will see you and decide which side they will pass you. So just cross the street and don’t hesitate.

Indian Food

The main reason I really like to go to india is the food. Indian food is really awesome. Spicy and very different from our european food. I found out that Hyderabad is famous for its Biryani and that they eat spicier than in the rest of India.
I don’t mind, i’m used to eating quite spicy.
In India they also eat in a special way: with the hand. Only the right hand, the other hand is used for “other purposes” (Do the math…) That is a bit difficult being a lefty but I managed. Yes I ate with my hands as well. When in Rome, do as the Romans.

Deployer

I learned that the system of “Generate Code, Generate RXF files, Deploy, switch to IDE, compile” is still difficult for people to understand.

if you follow the IBM way of creating an adapter for Rhapsody, you generate code in Rhapsody, that will also generate a makefile and you build from Rhapsody. As already said, we decided to do this differently because:

  • command-line length in Windows. Large Applications cannot be built like this
  • too many settings and extra files you need for embedded targets

So we use a different approach.

  • Generate
    Still generates Code from the Rhapsody model
  • Build
    Does not really build but generates the RXF include files that provide the static settings for e.g. the Memory Blocks etc.
  • Deploy
    Depending on the version of the RXF, we have called deploy in the “run” phase but now we call that mostly in the “Build” phase.
    It takes your Rhapsody generated sources (And the RXF includes _and_ the complete RXF and inserts them in a prepared IDE project.
  • Switch to your IDE
    Windows TAB, your IDE will probably show you that files have changed
  • Compile
    Use your IDE to compile. And Debug.

What you lose in this way is the roundtripping, unless… you select the Rhapsody Generated Source Directory as Home for your IDE Project.

Common misunderstandings/problems:

  • using Tools, <RXF> Deployer Configuration only configures the deployer. It does NOT deploy!
  • You have to prepare your IDE project. We deliver the “Getting Started” project (And a backup) that works. Your own project must include some things like “RXF” and “Generated Source” Folders. Check your Documentation.
  • If you have made changes to your IDE project: SAVE!!!! Deploy will use the IDE settings on the disk and will also overwrite your changes…
  • Clean up your old Rhapsody sources in Rhapsody (Code, Clear Redundant Source Files) to prevent them from being deployed.

I hope this helps you in understanding the RXF!

Back to India


OK, that’s it, have fun with Rhapsody and the RXF!

Walter van der Heiden (wvdheiden@willert.de)

Memory Management in the RXF

Introduction

Many users have asked me how they handle Memory Management when they use the Willert RXF as Framework.

There are 3 types of memory usage in C/C++:

  • Compile time (or static)
    this means that you declare something and the compiler/linker will take care of locating and allocating memory for it. (e.g. char MyArr[20]; will declare a 20 character array)
    You can find variables like this in the linker map file.
  • Heap
    This is what malloc uses and what many RTOSes use when allocating memory for their structures.You cannot find it in the map file specifically, you will find the heap size there. But the variables that use it are located in run-time.
  • Stack
    The most dangerous one… local variables are located on the stack as are function calls. compilers and or RTOSes offer stack check routines but they can be not reliable. Mostly they work with a standard pattern that is written on the stack (0xAA or 0x55) and compare that after each function call.

The RXF uses its own memory management. If you select the <<RXF Component>> stereotype for your current component and generate code for it, there will be „malloc()“ statements in the generated code.
But… this does not call malloc. Instead these calls are mapped (using a macro in WSTmodelling.h) to a function called WST_MEM_getMemory().

This function uses predefined and pre-allocated memory blocks. This shifts the use from heap to compile time.Why are they there and why do we not use malloc?

Easy. We do not use malloc for two main reasons:

  • Memory de-fragmentation
  • Malloc is non-reentrant.

Using our own memory allocation routines solve both problems. Our routines are protected using semaphores and because we only have pre-defined sizes, fragmentation cannot occur. How does this work?

There are a couple of properties that define size and number of these predefined blocks. Here we can define the exact size (in bytes) of each block type.There are 5 different block types:

– Tiny, Small, Medium, Large and Huge

The properties where you can define the number of blocks and the size are called:

- C_CG::Configuration::WSTTinyBufferSize - C_CG::Configuration::WSTInitialTinyBuffers

- C_CG::Configuration::WSTSmallBufferSize - C_CG::Configuration::WSTInitialSmallBuffers

- C_CG::Configuration::WSTMediumBufferSize - C_CG::Configuration::WSTInitialMediumBuffers

- C_CG::Configuration::WSTLargeBufferSize - C_CG::Configuration::WSTInitialLargeBuffers

- C_CG::Configuration::WSTHugeBufferSize - C_CG::Configuration::WSTInitialHugeBuffers

Setting the number of a certain type of blocks to 0 will remove every bit of code used for that specific block type.

NOTE!: make block sizes sequential increasing. So Tiny MUST be the smallest and Huge MUST be the largest. Otherwise the getMemory function will not work properly.

Taming the RXF

The properties for setting these sizes are available in Component and Configuration, we recommend setting them in your configurations. In that way you can easily create other configurations with different sizes to experiment.

Can I check how many blocks I have used and if they have the right size?

Yes you can check how many blocks you have used, check the HighWaterMark section. The size is a bit more difficult.You need to check the map file for the sizes of the elements that you allocate. You can also enter your debugger, set a breakpoint to the WST_MEM_getMemory routine. Each time you enter the breakpoint your application is requesting memory. Check the „requested_size“ variable and write them down.The call stack will reveal which routine requested memory.

As a rule of thumb: use one block type for events, one for events with parameter, and one for small classes. Set the other two to 0 so they won’t be there. Only use them if you want to use a finer use of your available memory. For larger classes use static allocation. If you use tasks, you will need memory for the allocated message queues, calculate their size and use another block type for that.

The best way to check how many blocks you have used is of course to use the Embedded UML Target Debugger, it shows you these numbers directly!

What to do if I run out of free memory blocks?

The allocator tries to use the best fitting block. So if you have blocks of 10, 20,30, 40 and 50 bytes, allocation 8 bytes will normally give you a 10 bytes block.When these are not there, you get a 20, then a 30 and so on.

If there is no fitting block left there are 2 options depending on the defines you set when compiling.

– The program will call the error routine with the Error:WST_ERR_ALLOC_TOO_LARGE.

You can (or actually should) change the error routine and adapt it to your own needs. (e.g write in a logfile or something like that)

– The original malloc routine is called.

This will only succeed if you reserved enough heap space so that malloc can give you the memory that you need. If not you will inevitably run into some kind of trap for using illegal memory.There are RXF versions that run into the error handler (Error:WST_ERR_ALLOC_FAILED) when malloc returns NULL.

What Defines and Properties influence the memory usage?

Using Tasks will also use your predefined memory blocks. Every task has a message queue, depending on the used RTOS there will be memory allocated for that.There are properties for tasks that influence the used memory.

CG::Class::ActiveMessageQueueSize will set the message queue size.There is a default size, this is what the RXF uses if you do not define your own.The size of the message queue is defined as „number of messages“.A message in UML is an event and it is sent by reference so there is only one pointer per message.The size of the pointer depends on the used CPU/Memory model. So on an ARM Cortex with the Keil compiler this means that a message queue size of 20 will use 80 bytes of blocks.

The Timer Array is static, it is depending on the property C_CG::Configuration::WSTMaxTimeouts. The array is allocated at compile time.

WST_CFG_HIGHWATERMARKS.When set to true, extra code is used to keep the largest number of reserved blocks.You can check the number in theWillert Embedded UMLTarget

Debugger or in your own source code debugger by typing „highwater“ in a watch window.This is an array that will show you the actually largest number of used blocks.

NO_MALLOC.When set, this will cause the RXF to NEVER use malloc. Rhapsody generated code can still use malloc, but the framework will not.

WST_FORCE_ALLOC_TOO_LARGE. Causes the RXF to use malloc when it runs out of memory blocks.


That’s it for today! Happy modeling with Rhapsody (and the RXF of course!)

Walter van der Heiden (wvdheiden@willert.de)

Happy New Year!

I wish everybody a “model” 2018! I had a little break during the christmas and new year holidays. Traveling is cool, but even a modeling traveler needs some rest once and a while.
But now we started a whole new year, 2018, and we have lots of plans to improve modeling in embedded.
IBM is also cooperating, they released Rhapsody 8.3, a brand new version with lots of changes!

AUTOSAR: migration of models to older versions of AUTOSAR

In release 8.3, for migration of AUTOSAR projects to an older version of AUTOSAR, additional target AUTOSAR versions have been added.

Code-centric mode: roundtripping changes to operation signatures

Prior to release 8.3, in code-centric mode, if you renamed an operation or modified its parameters and then roundtripped the code, the old operation was automatically removed and a new one was created in its place.

Beginning in this release, when roundtripping such changes, you have the option of retaining the existing operation and having it marked with a stereotype called MergeCandidate. After roundtripping, you can then go through these operation and merge them with the new operation that was created. The new operation body and declaration will then be copied to the existing operation, which will retain any other existing information such as dependencies. The second operation will be discarded. To enable this option, set the value of the property MarkMergeCandidateOperations to True.

Code-centric mode: support in 64-bit version of Rhapsody

You can now use code-centric mode in the 64-bit version of Rhapsody. However, code cannot be generated while in code-centric mode.

Configuration Management integration: renaming/deletion of Rhapsody units

Prior to release 8.3, if you renamed a Rhapsody element that was saved as a separate unit, the name of the file representing the unit would always keep its original name. Beginning in this release, if you configured Rhapsody to use the integration with Rational Team Concert (using the CMTool property), then when you rename a model element that is a unit, you will be asked whether you want to also change the name of the underlying file. This behavior can be controlled by the property RenameActivation.

Similarly, if you delete a unit, you will be asked whether you want to also delete the underlying file. The deletion behavior is controlled by the property DeleteActivation.

Modeling: “satisfy” stereotype in non-SysML projects

The “satisfy” stereotype, previously available only in SysML projects, can now be applied to dependencies in all Rhapsody projects.

Modeling: ownership of dependency between two other elements

Beginning in release 8.3, an element can be the owner of a dependency between two other elements. Among other uses, this makes it possible to create a dependency between two read-only model elements.

Modeling: selection of type for flowport

Now, when you try selecting a type for a flowport, the dialog remembers the last location used, allowing you quicker access to the relevant elements.


Rhapsody repository files: move to XML format

Beginning in release 8.3, the files used to save Rhapsody models are in XML format. To help differentiate between the new repository files and the repository files used in previous releases, the letter x has been added to the file extensions. For example, the main file for the project now uses the extension .rpyx instead of .rpy. Existing projects that are saved in version 8.3 of Rhapsody will be saved in the new format.

Statecharts: multi-line display of code for entry action, exit action, and internal transitions

Prior to release 8.3, in the graphical compartment used to display the code for a state’s entry action, exit action, and internal transitions, each of these items was allocated a single line, regardless of how long the code was.

Beginning in this release, there is an option to have the compartment display multiple lines of code when required. For individual states, this can be set in the Display Options dialog. If you want to set this as the default behavior in all your projects, you can add the following property to your site.prp file with a value of True: General::Graphics::SupportMultiLineCompartment.

Support for Red Hat Enterprise Linux 7.2

Rational Rhapsody can now be run on version 7.2 of Red Hat Enterprise Linux.

TestConductor/ATG: information about model elements not covered

In TestConductor and ATG, requirement coverage results now also include information about the model elements that are not covered.

TestConductor: testing of private/protected operations

Beginning in this release, TestConductor includes an option for testing private and protected operations by calling them directly. See the example and related documentation in the TestConductor Testing Cookbook.

TestConductor: user guide for assertion-based testing

The documentation for TestConductor now includes a new user guide (TestConductor_User_Guide.pdf) that deals only with C/C++ assertion-based testing mode. The existing user guide (RTC_User_Guide.pdf) now deals only with animation-based testing mode (Ada, Java, and C/C++).

User Interface: enhanced dialog for setting display options

Many element types now use a common tab-based dialog for setting display options.

User Interface: use of new combo box for filtering

A number of dialogs now use a new combo box that dynamically filters list elements as you type.

XMIToolkit: UML 2.4.1 namespace

XMIToolkit now recognizes the UML 2.4.1 namespace

XMIToolkit: activities with horizontal swimlanes

Now, when importing activities that contain horizontal swimlanes, the swimlanes are rotated so that they can be brought into Rhapsody.

In the next week we will test 8.3 ourselves and check compatibility with our RXF.

Happy modeling with Rhapsody in 2018!

Walter van der Heiden (wvdheiden@willert.de)

« Older posts Newer posts »

© 2026 Rhapsody TechBlog

Theme by Anders NorenUp ↑